Accessing this feature
Your access to the feature described in this article depends on your license package and pricing plan.
To learn which features are available to your organization and how to add more, contact your Hyperscience representative.
A nested table is a data structure that represents a table within another table. It creates a hierarchical relationship (a “nested” structure) where child table rows inherit context from parent table rows.
Nested tables are used to extract data from documents with complex table structures, where detailed rows (child rows) belong to higher-level summary or grouping rows (parent rows).

Hyperscience currently supports:
One or multiple tables. To learn more, see Table Identification.
Single level of nested hierarchy (child — parent).
Side-by-side tables.
Elements
A nested table consists of two elements:
Child table — the embedded element of the structure. It represents a detailed table that contains granular, line-level data. Child tables usually contain more rows and more columns.

Parent table — the “outline” of the Nested Table. It contains general information and usually consists of rows above and below the child table.

How nested tables are processed
Nested tables are processed hierarchically. All child table rows must be annotated first, across all parent tables, before any parent table rows are annotated. This order is required because:
child rows are assigned to parent rows based on parent row boundaries
parent annotations depend on completed child annotations
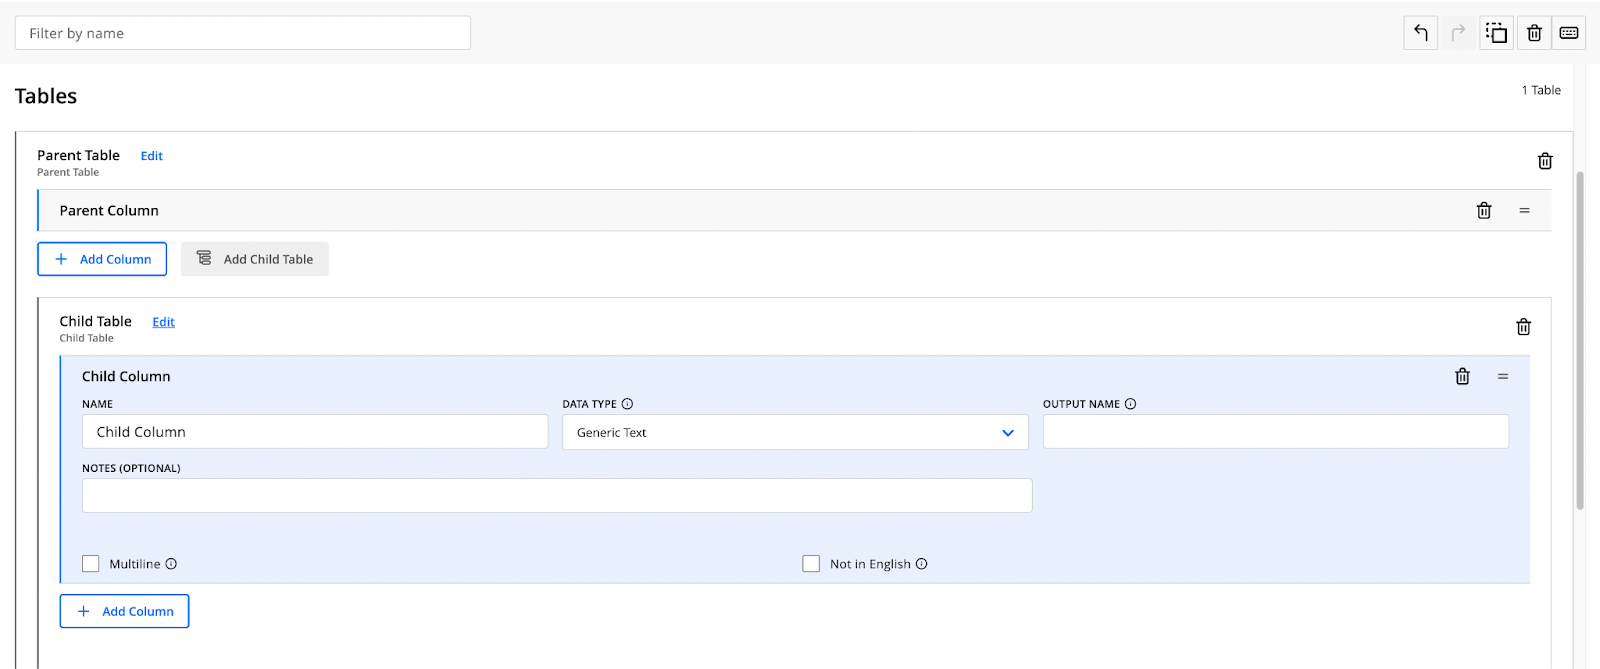
Creating a layout with nested tables
In the Layout Editor, add a new table by clicking the Add Table button at the bottom of the Tables card.
Clicking the Add Table button automatically creates a new table.
To learn more about semi-structured layouts see Creating Semi-structured layout.
Define a nested table by adding a child table.
Doing so automatically creates a parent table for this layout.
Create a child table by clicking the Add Child Table button.
Once you create all columns, click Save Changes and create a release with the new version of your layout. Learn more in Editing a Release and Assigning a Release to a Flow.
Annotating nested tables
You can annotate nested tables in Supervision and in Training Data Management (TDM).
Training Data Management
To start the annotation process in TDM:
Go to Models > Identification
Find the name of your layout and click on it. The Field ID model management tab will open by default.
Switch between tabs to open model management for Table ID.

Find the documents for your Table ID training in the Training Data table. To learn more about model management, see TDM for Identification Models.
To start the annotation process, click the Annotate button in the Actions column.

Annotation process
When a document contains nested tables, the system will first prompt you to annotate the child table.
While annotating child tables:
Complete all child rows for all parent tables.
Child table row boundaries are indicated with a dashed line
Ensure each child row is placed within the correct parent row boundaries.
Verify that no child rows remain unannotated.

Only after all child tables are completed will the system allow you to proceed to the parent table annotation.
After all child rows are annotated, you can proceed to annotate the parent table.
Use the right-hand sidebar to navigate between tables.
Parent rows define the grouping structure used to associate child rows.
Parent table row boundaries are indicated with a solid line
At this stage, all child rows should already exist and be correctly positioned.

The number on the left displays the consecutive number of the parent row (e.g., 1, 2, 3), while the number on the right is a combination of the consecutive number of the child row and the child row’s parent row (e.g., 1-1, 2-1, 3-1), as shown in the screenshot below:

If child rows fall outside the boundaries of their corresponding parent rows:
A warning appears when saving the document. Make sure to adjust before model training.
.png?sv=2026-02-06&spr=https&st=2026-06-15T14%3A33%3A22Z&se=2026-06-15T14%3A48%3A22Z&sr=c&sp=r&sig=fwiRCAYHnb%2FWGCP3EMsdn8w77cj6hxwRmitpAoJfvng%3D)
TDM allows you to display a certain column by selecting it in the Visible Columns drop-down menu at the top of the page. This is useful when you have more columns in your documents.

Supervision
.jpg?sv=2026-02-06&spr=https&st=2026-06-15T14%3A33%3A22Z&se=2026-06-15T14%3A48%3A22Z&sr=c&sp=r&sig=fwiRCAYHnb%2FWGCP3EMsdn8w77cj6hxwRmitpAoJfvng%3D)
The annotation logic for nested tables is the same in Supervision and TDM.
Regardless of the experience, the required annotation order remains the same
Child tables must be annotated before parent tables.
The difference is only in how the steps are presented:
In Supervision, the child and parent table annotations are shown as separate steps on different screens.
In TDM, both steps are available within a single screen.
Annotating nested tables is similar to annotating regular tables. Learn more in the section below.
Best Practices
Select a row from the child table to be a Template Row
We recommend selecting a row where all data is present.
Select a row with multiline values for the best performance of the Copycat.
Use rows with longer values.
In the example below, the middle row has the longest values; therefore, we’re setting it as a template row.
Copycat populates the annotations to the rest of the rows.
Use
WandEon your keyboard to switch between columns.

Once the template row is annotated, click Continue to review CMD + Enter.
Make sure to press the
ESCbutton on your keyboard to review all rows.Switch to the parent table as shown below and follow steps 1-2 to complete the annotations.

In Supervision, click Continue to next table CMD + Enter.
Once the template row is annotated, review all rows and click Continue to Review CMD + Enter.
In TDM, click Save Changes and continue with the next document.
In Supervision, click Submit Task to continue with the document processing.
For more information on how to annotate tables, see Table Identification. To learn how to train an Identification model, see Training an Identification Model